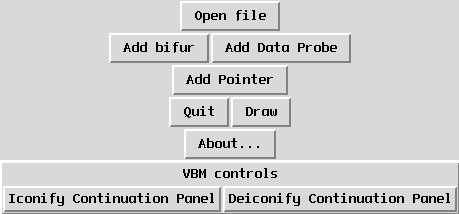
The main control panel for VBM. Modules are created and controlled from here.
There are 2 parts to the VBM tutorial. The first shows you how to start VBM and use it for visualizing a data set. The second demo shows you how to use VBM to steer parameter continuation calculations. They should be read in order, since each section builds on the previous. Also, these tutorials (especially the second one) assume a certain level of knowledge of Unix. The prerequisites for each tutorial are listed here as well. If you don't have any of the prerequisites please then ask your local Unix guru :-).
If you have not yet installed VBM, installation instructions
can be found in
Section.
We recommend that you
have VBM installed before starting the tutorial, so that you can
follow along by actually performing the various actions in the
tutorial.
We will assume throughout the tutorials that VBM is installed in
a directory called /foo/VBM. In all of
the commands that follow you should replace /foo/VBM,
with the directory where it is actually installed
on your computer.
The main VBM program is
/foo/VBM/bin/VBM.py
VBM also takes several command line options
Selects the default file on which to run VBM
Selects the default directory in which VBM can look for data
Turns off automatic file backup (VBM normally creates a new file by adding ".vbm_modified" to the given file name and only modifies this file, not the original)
Selects a default bifurcation view file
Selects a default physical view file
Change directories so that your current working directory is the VBM installation directory.
cd /foo/VBM
Start VBM by typing the command
bin/VBM.py -n -f data/demo1
A window similar to the one shown in Figure should appear. If it doesn't you can see Section for more help.
The main control panel for VBM. Modules are created
and controlled from here.
This is the main control panel for VBM. From this window you can add bifurcation views, data probes, computations, and pointers. Now, press the "Add bifur" button. This brings up a dialog in which you can select a bifurcation view module to add, as shown in Figure.
The window from which various Bifurcation
Visualization modules may be selected.
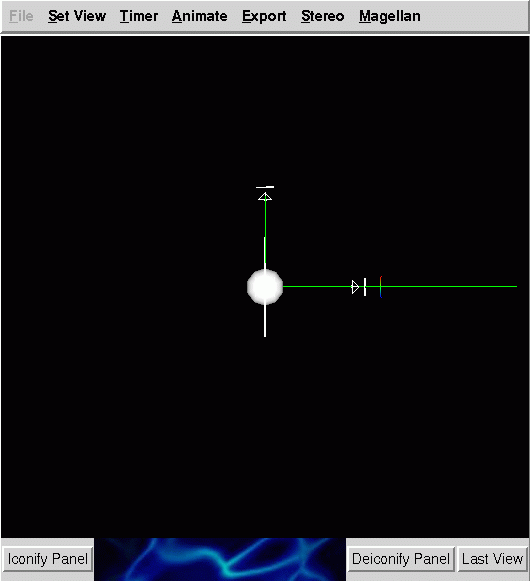
Select the "3D DataViewer Graphics" module, under the "General" heading, and press the "ok" button. This will create a bifurcation new view window as in Figure.
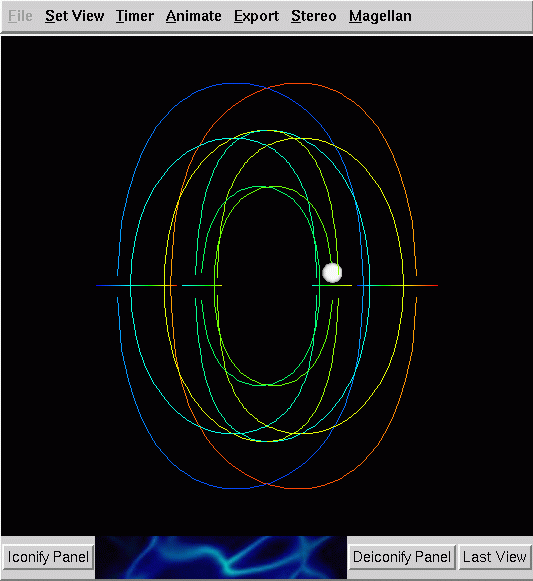
An example of a Bifurcation Visualization module.
This bifurcation diagram is a collection of one dimensional manifolds. There are several ways to interact with this diagram.
If you wish to spin the diagram around you can press the middle mouse button in the window and drag it around. If you let go of the middle mouse button while you are dragging the mouse the bifurcation diagram will continue spinning, and it can be stopped by clicking the middle mouse button without moving the mouse.
If you press the right mouse button on the diagram, and move it around, you translate the bifurcation diagram.
You also notice the white sphere on the diagram. This sphere marks a point on the diagram to which you can attach data probes or computations, and it may be moved around by clicking on points of the bifurcation diagram using the left mouse button.
If you hold down the shift key while pressing the middle button you can zoom the diagram by moving the mouse up and down.
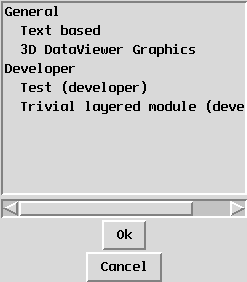
A data probe indicates or visualizes the solution at a point of the bifurcation diagram specified by the pointer, the little ball. Now we are going to add a data probe to the bifurcation diagram: Choose a point of the bifurcation diagram using the left mouse button, the pointer will move to that point. Then press the "Add data probe" button. This will bring up a dialog in which you can select a data probe to add, as in Figure.
The dialog in which Data Probes may be selected.
Choose the "Numeric data at one point" module, under the "General" heading. This creates a window in which is displayed all of the numeric values corresponding to that point of the bifurcation diagram, as in Figure.
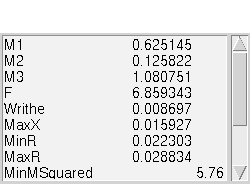
A simple text based Data Probe.
Take a few minutes now and move the pointer around the bifurcation diagram using the left mouse button and notice how the data changes in the data probe window.
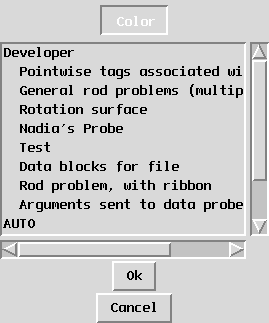
The idea is that the bifurcation diagram gives you an overview of the data and the data probe shows something specific about the point marked with the ball. Now, if you are feeling adventurous you can try to add other bifurcation and data probe modules and move the pointer around to see how they change. Modules that are under the "General" heading (for either bifurcation or data probes) should work for any data set (including this one). Depending on your installation you may have access to a special data probe under the "Ring" heading called "Rod problem (with ribbon)". Not all installations have this data probe, since it is very specialized, and if yours doesn't you may safely ignore the rest of this tutorial and continue with the next section. If you do have the "Rod problem (with ribbon)" data probe add it now. You will get a window similar to Figure.
This is another 3D graphics window, and it can be manipulated similarly to the bifurcation window you added first (middle button rotates, right button translates, and -middle button zooms, left button doesn't do anything for this module). Move the pointer around the bifurcation diagram and see how this window changes. When you are done hit the "Quit" button on the main control panel.
If you want you can add more pointers hitting the button "Add Pointer". Each pointer ball will have a different color. For each pointer you can add data probes. To switch between pointers you have to hit the corresponding color button in the panel under "options".
It may happen that you won't see what you expect in a bifurcation diagram or in a data probe. Then, maybe the choice of the coordinate axis is inappropriate.
The data for this demo is stored in the directory
/foo/VBM/demos/planar_strut
This demo will write temporary files as it does its computations, so you need to copy the contents of this directory into a place where you have write permission. For example you could copy it into your home directory with the command
mkdir ~/VBMdemo;
cp /foo/VBM/demos/planar_strut/* ~/VBMdemo
(Note: The directory needs to be writable by you to run the demo. If VBM is installed read-only (which it is in the LCVM) you may in addition need to do use a command such as the following the set the permissions correctly.)
chmod -R u+w ~/VBMdemo
cd ~/VBMdemo
In this tutorial we will be using AUTO94 as a compute engine. AUTO94 is a Fortran program and, hence, we will need to tell VBM two pieces of information before we continue.
First we will
need to tell VBM where AUTO94 is installed, and second we will
need to tell VBM a command which can be used to compile
Fortran programs. This information is communicated to
VBM via the environment variables VBM_1D_AUTO_HOME
and VBM_1D_AUTO_FORTRAN_COMPILER. VBM_1D_AUTO_HOME
should be set to be the directory in which AUTO94 is installed
and VBM_1D_AUTO_FORTRAN_COMPILER should be set to the name
of your Fortran compiler plus whatever flags it needs to compile
AUTO94.
For example, if you are using the sh or bash
shells you could type:
VBM_1D_AUTO_HOME="/usr/lcvm/auto/94";export VBM_1D_AUTO_HOME
VBM_1D_AUTO_FORTRAN_COMPILER="f77 -O";export VBM_1D_AUTO_FORTRAN_COMPILER
Or, if you are using the csh or tcsh shells you could type:
setenv VBM_1D_AUTO_HOME "/usr/lcvm/auto/94"
setenv VBM_1D_AUTO_FORTRAN_COMPILER "f77 -O"
Now you can run VBM with the command
/foo/VBM/bin/VBM.py -f strut.vbm
You should get a window which looks like Figure
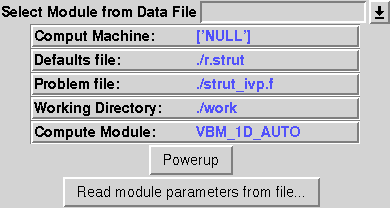
Hit the "Deiconify Continuation Panel" button. This will bring up the Compute Module creation panel Figure
Hit the "Powerup" button and hit "ok" in the pointer selection window Figure.

You should now have a Compute Engine control panel Figure.

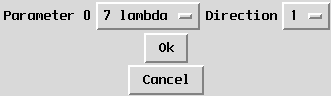
This is the window where the compute engine (AUTO94 in this case) is controlled. The "Pointer Color" block shows the color of the pointer to which this module is associated. The three lights on the left show the current state of the engine (in this case it is "Idle"). The buttons on the right control the module. Press the "Start" button now. You will get a dialog in which you can control the start parameters, just hit "ok" Figure.
The engine will run for a few seconds now (depending on the speed of your computer) and the status lights will flash. Hit the "Extend" button. This will bring up the "Extend dialog" Figure.
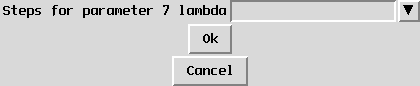
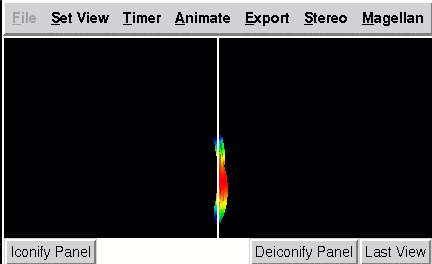
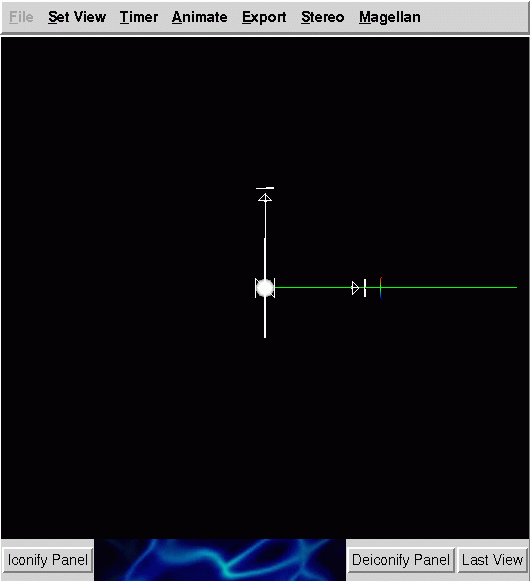
Change the "Steps for parameter 7" to be 10 instead of 1 and hit "ok" (don't forget to hit the "return" key after you enter 10, if you forget you will only get one point). So, we have created some data, let's take a look at it. Start up a bifurcation visualization module (the "3D DataViewer Graphics" from the previous tutorial). You should get something which looks like this Figure.
By the way, if you want to compute in the minus direction, choose the -1 direction in the panel with the start parameters. In the next window the number of steps must be negative.
Let us take a moment and try changing some of the options for the bifurcation diagram viewer. For example, we can change the size of the pointer sphere by hitting the "Deiconify Panel" button on the bottom on the bifurcation window. If you press it you will get the control panel for the bifurcation window Figure.
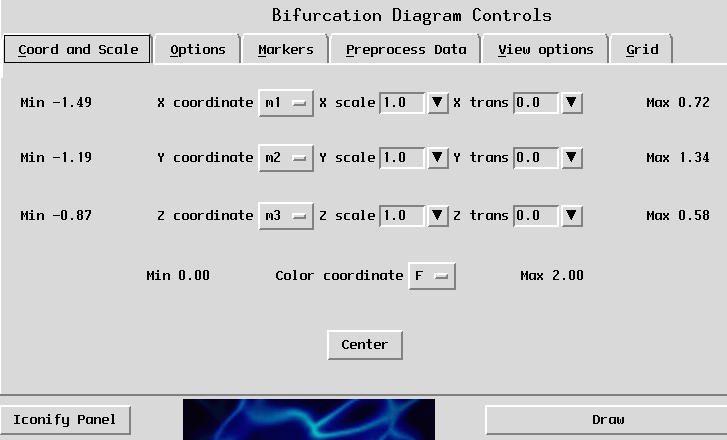
Press the "Options" tab to get the options control panel Figure.
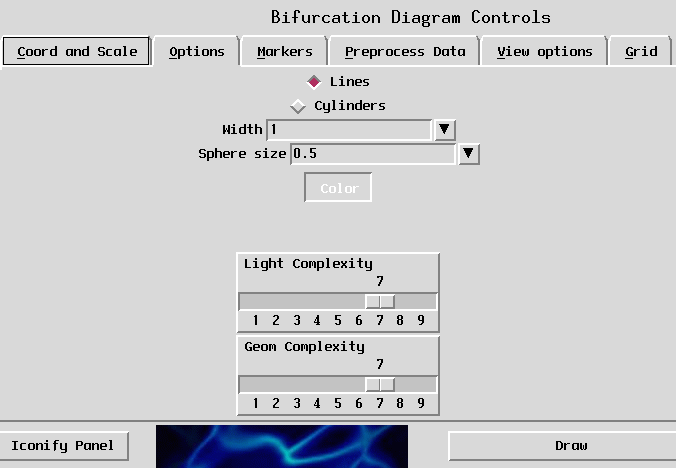
Change the "Sphere size" from "0.1" to "0.2"(don't forget to hit enter after you do this) and hit "Draw". That will be change the size of the pointer sphere (which can be useful, for example, when you zoom the bifurcation diagram) Figure.

Let's do a second continuation by hitting "Reset" on the Compute Engine control panel and then hitting "Start" again.
This time, when you get the start dialog change the "Parameter 0" from "7" to "9" (you can click on the little box with the arrow on it to the right of the label to do this, since this widget is read only). Hit "Extend" again and do 10 points. You should see a new branch Figure.
Now we will add a Data Probe. Choose "Add data probe" from the main VBM control panel and choose "General AUTO solution" from under the "AUTO" category. You will get a window which looks the one in Figure.
Press the "Deiconify Panel" button on the bottom of the window to get the control panel for this module Figure.

As the compute engine specifies the fortran file containing the description of the problem, this module compiles the problem when you launch it. You still need to set the "X coordinate" to be "s", the "Y coordinate" to be "r1", and the "Z coordinate" to be "r3" by using the little buttons right to the right of the labels. Hit the "Draw" button once again. You will now have a window which looks like this Figure.
You can now click around in the bifurcation window and this data probe will show a curve which represents the solution to the problem computed by AUTO94.
This is the end of the VBM tutorial. In it you have seen how to manipulate bifurcation and data probe modules and well as how to use VBM to control the compute engine AUTO94. The same ideas can now be used with other compute and visualization modules.
Always hit the "Enter" button when giving entries. Always hit the "Draw" button after you made changes in the panel for both bifurcation diagram or data probes. Otherwise VBM may not react.